Friday, June 17, 2016

Carving, Stamping, Sewing Oh My!

I just spent four very exciting days at Bishop's Ranch in Healdsburg, CA. with Jane LaFazio.  The Garden Patch: Mixed Media Art Quilt workshop was interesting from start to finish. I haven't done too much of this type mixed media or "free form" quilting so I found myself a bit out of my normal comfort zone.  Being outside the safe zone can be so much fun when I can simply embrace it and trust the process!
                                                                       
First we wandered around the Ranch property in search of inspiration in the forests, gardens and fields.  Then we did some very quick sketches to use in the design.
Based on our sketches we carved stamps and began the process of designing our small 12 x 12 quilt.  
Stamps from our group.
My oak leaf stamped on a tea bag.


The scary part of this process is that once we had a rough design tacked down in a pleasing pattern we turned it over and without looking cut it into squares.  Did I mention we didn’t look at the front of the quilt while cutt?  After we had 9 squares cut we turned them over and put them together in different ways.  This part was really interesting to do.

                     
Cut up into squares.
Once settled on a design, the next step was to attach the rows to the felt backing and embellish with beads, baubles, lace, and lots of interesting stitches.  I thought this part might be tedious since I don't do hand work normally.  Turns out this stage was very pleasant.  We sat around talking and laughing and sewing.


So my project went from this pile of possible elements........


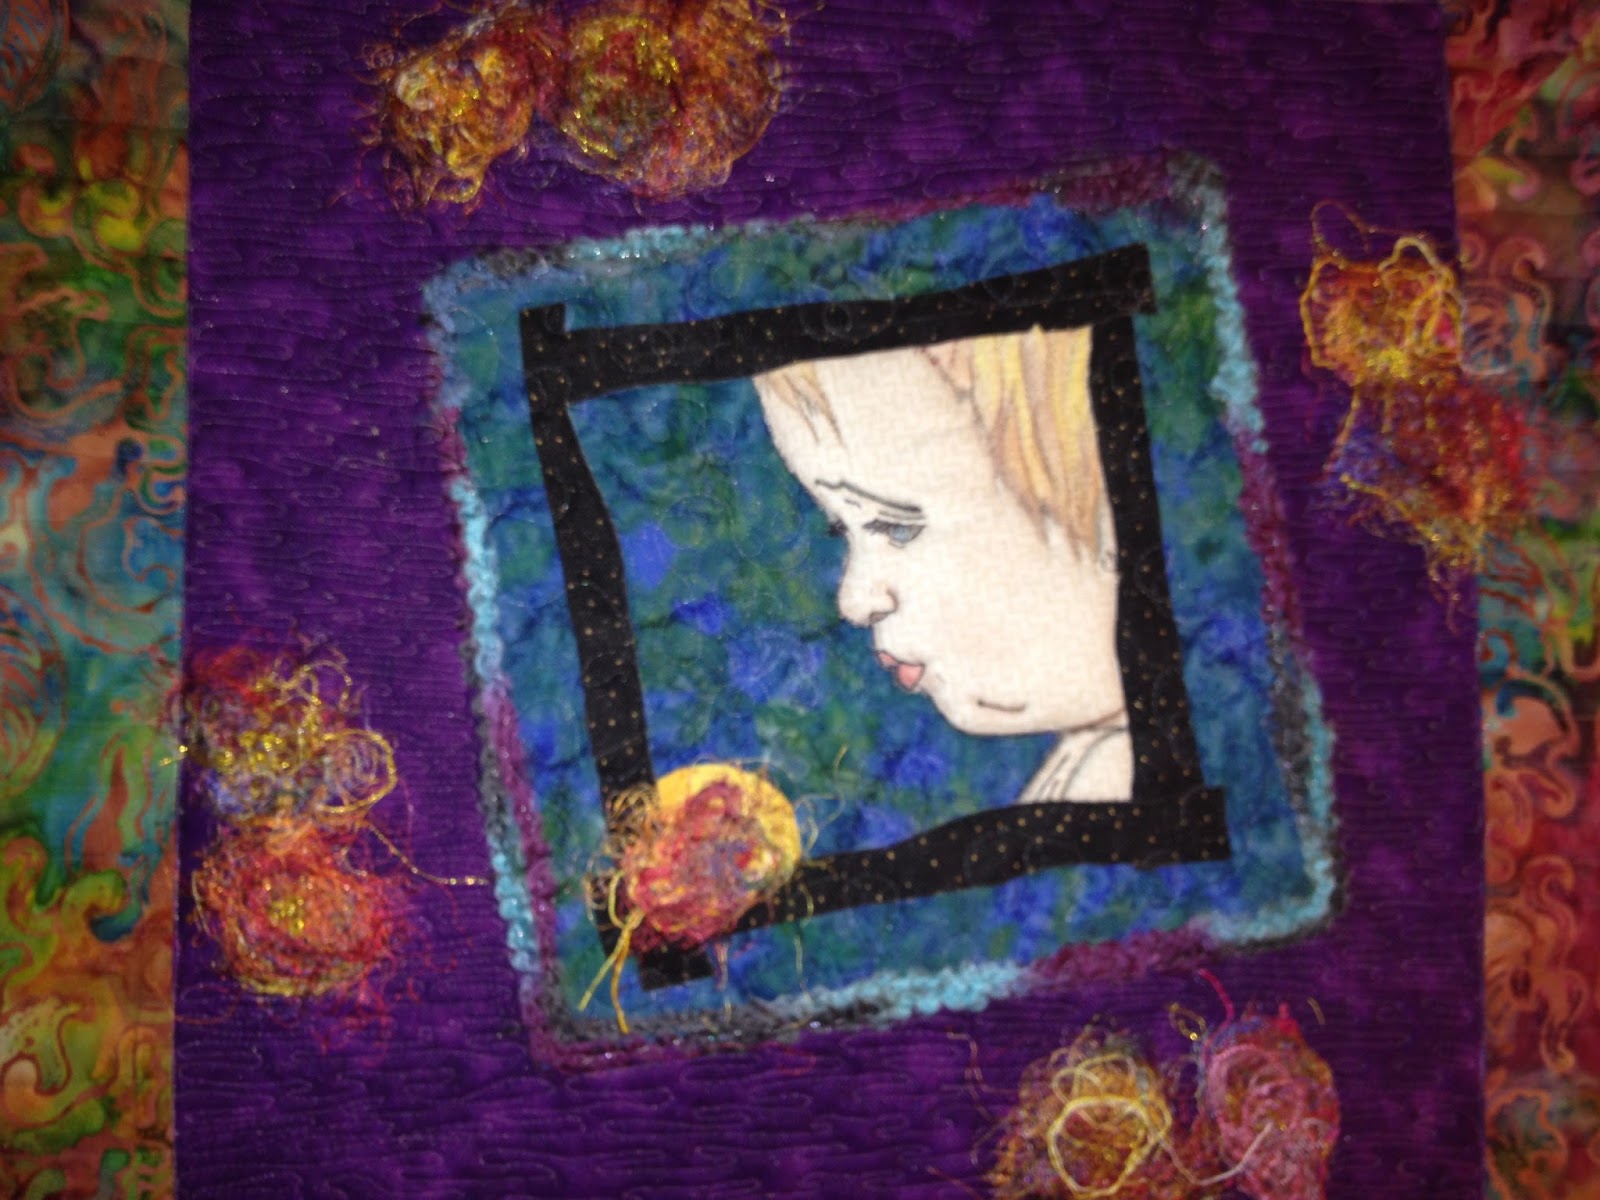
To this finished small art quilt!


This is my band of art quilters and what a creative group they are!! Our fearless teacher is front and center of course.  Thanks to each of you for your encouragement and inspiration!

Keep creating and generating ideas!

Check out what is happening on Off The Wall Friday.

Sunday, May 15, 2016

Fabric coiled bowls and baskets galore

Remember Macramé?  Used to do a ton of it back in the 70's along with lots of other hand crafts like tye dying, embroidery on my bell bottom pants, jewelry making  and wood carving.   One craft I have rediscovered recently is creating baskets and bowls using fabric coiled around clothesline.  It's a great way to use up some scraps and the extra binding pieces that I always seem to cut.  

This project doesn't require a ton of new and expensive supplies either.  Most of us have plenty of fabric on hand to make several bowls, baskets, trivets, place mats or what ever.  I watched a YouTube tutorial and made these bowls. The only thing I purchased was 50 feet of clothesline about 1/4 in in diameter.

Once the cord is wrapped just stitch it using a zig zag.  The tutorials will show you how to start the sewing which is the only tricky part of the project.


I used two different fabrics, with similar colors, for the bowls pictured above and below.  Each fabric had a really different pattern yet when coiled the two look almost identical in color.


For the next bowl I will create the embellishment using coiled and covered clothesline with some baubles.  I'm not too happy with the little flowers but they are firmly glued on so I'll live with them!


Projects like this are a nice change from piecing and quilting in general.  I like the three dimensional result and wrapping the clothesline is a good evening activity while I'm sitting in front of the TV with my hubby pretending to enjoy the history channel.

Have you made anything using fabric wrapped clothesline? 

Keep creating.... 

Linking up with Nina Marie today.

Monday, May 9, 2016

Mandalas Make Me Happy

I was looking through an old portfolio and found a series of pen and ink mandalas that I drew back in 2010.  (Truthfully, I was cleaning under the bed in the guest room).  I hadn't looked at the drawings in quite a while and I wondered what my inspiration was to draw so many mandalas.  They were mostly 20 x 16 or 14 x 17 sizes and very intricate.  I must have spent hours on each drawing and I had an entire portfolio of them! At first there wasn't a clear memory or intention that I recalled to start a series of mandalas or try new pens and techniques either.  Here is a example of one larger mandala.


As I looked at the details in the lines,  the memories all came flooding back.  2010 was a very challenging year, I had experienced some significant loss and had a huge career change.  No wonder I had blocked it out and the drawings were under the bed.  I tend to retreat to my art when I have problems that need to be thought through.  The drawing helps me to go within and to listen to my inner wisdom I guess.

I remembered sitting for hours on end drawing, with my attention completely on the lines and how they connected.  I had control over the lines and with those lines as my focus I had a task for my "thinking brain" and the solutions I desired could surface on their own unimpeded.  The time drawing was my meditation during those tough months.  It worked and I successfully maneuvered into happier times.


I feel so lucky to have a creative outlook for both the happy and difficult times.  These forgotten drawings are now out in the light and remind me that I'm strong and can handle challenges.  To you it may look like a bunch of lines, to me I see the details of my story.

Do you have a story?

Keep creating.....


Friday, May 6, 2016

Solvy and Thread-A good match!

I love to try new things most days, well not involving math, but most other creative and artsy things.  I took a Craftsy class and learned about this product Solvy.  Comes in various sizes and weights and is very useful stabilizing applique among other things.

I have been having fun making thread leaves and other nature shapes using just thread and Solvy.  I enjoy doing the thread work, which takes much longer than I expect it to take, and then placing my piece in the warm water.  Once the Solvy dissolves you are left with a lovely and delicate element that sometimes looks like lace.

Here is quick sketch on the Solvy.  This medium weight feels a bit more like paper and is much easier to draw on.


Here is what my butterfly looks like in process.  I still have quite a bit more free motion to do before it can take a water bath.


Here is an example of a leaf.  I've done a few of these and they were the most fun.  Using variegated thread really adds to the interest of the leaves.  I've made butterflies, leaves and lots and lots of circles that might end up as flowers in the the future.


I'm in an experimentation mood lately and wanting to try some different techniques.  At this moment I'm not sure how these elements will be used but I sure the inspiration will come at some point.  In June I will attending a mixed media art retreat with Jane LaFazio at Bishop's Ranch in Healdsburg, Ca. and maybe I'll end up using the leaves on my quilt there.

If you have never been to Bishop's Ranch it is a very special place in a beautiful rural setting in Northern California.  I attend several quilting retreats there each year.  It's a wonderful place to create art, meditate, walk or contemplate life.

How would you use these lacy leaves?  Let me know your experience with Solvy if you feel inspired to.


See you later and keep creating......


I'm linking to Nina Marie this week.

Sunday, May 1, 2016

I Can Or I Can't Quilt This!


I think that Henry Ford is the guy who said, " If you think you can or if you think you can't, you are probably right!" If we skip over our family histories and influences in life and just take this idea literally isn't it really just a choice?  Try or not try?  I think there is success in simply creating, regardless of the result.    How we think about an art project and where we put our focus has a huge influence on the outcome.  I say look towards success what ever that means to you.  If you don't like the result do it a different way.  Just keep looking forward.


I wish I could say that I try something that scares me every day or that I embrace challenges easily.  I don't and I sometimes talk myself out of trying before I have even gotten out my supplies.  The good news is, I'm focusing now on being more daring in my artistic journey.  Truthfully, we all start with a blank space and by our imagination and our hands we create something that was not there before.  Isn't that awesome?

Here are a couple of examples where I took a chance and just tried something totally new to me.  I took a Craftsy class from Lola Jenkins because I liked the title of the class- Thread Art.  This is my class project following Lola's directions.  The pebbles were my idea :)

The Girl With The Pearl Earring

I really wanted to try another art quilt and do something original.  This is my granddaughter when she was about a year old.  This first effort was an epic fail on a few levels!  I tried to cover up the mistakes but couldn't fix those eyes! 

Opps!
So I started from scratch again and had a better go of it to be sure! The colored circles were made with old thread and the water soluble Solvy.


I thought I would share my feelings about self confidence with you because I am fairly sure I'm not the only person who has grappled with this.  Let's encourage each other to be brave and create whenever and where ever we can!

I'd love to hear your story too.  Keep creating....

I'm linking back to Nina Marie!

Friday, April 29, 2016

It starts with a line...........

I've been doodling with Micron pens forever. It's relaxing to take a blank page or piece of fabric and start with one line, no rhyme nor reason. Just wander along and pretty soon something shows up.

The lines begin to work together, communicating and coordinating until they have come together into something that was never there before. I just love that! Every drawing is a surprise. Occasionally I attempt to doodle with a specific purpose but the free form is most interesting to me.

I’ve been experimenting with s style of drawing and free motion quilting called Graffiti. I saw a video of Karlee Porter that really inspired me. Here are a couple of my examples of pen on paper.


Recently I participated in a  quilt challenge with the theme WORDS. This is what my WORD quilt looked like. I really had fun quilting this and it flowed in much the same way that the lines on paper flowed, this was just with thread. I think I’m going to keep exploring graffiti and thread for awhile.


OK now I will admit that I struggled emotionally to create this little quilt since it was outside of my experience.  Lots of self-defeating thoughts followed me around but I persisted and sent those negatives away.  You know, "I don't think I can do this!  This is dumb! Everyone else will have a masterpiece!"  I don't think I am alone in this thinking either.    Maybe I'll talk more in the future about the idea of "I Can or I Can't -One of those is probably true!"

Keep creating....

Check out this blog for some great ideas!  http://ninamariesayre.blogspot.com

Thursday, April 28, 2016

Quilting heaven!

I’m just back home from a wonderful four day quilting retreat with 40 creative quilters!  It’s such an inspiring few days.  The first day we were asked to raise our hand if we were quilting less than five years.  My hand was the only one that went up!  Every one else in the room has been quilting for 20 years plus.  That is a lot of hefty experience in the room to be sure.

Friends enjoying retreat!

 I’ve been going to quilting retreat for 3 ½ years, as long as I have been quilting. This group of quilters is creative, funny and very helpful. I learn new tips and techniques every time I am there. The best part of the experience is forging new friendships. I really treasure the experience and am already planning my challenge quilt for next April!


Microwave Bowl Carrier - I learned how to make these at the retreat and here’s how you can make some too.

1. Choose two fabrics you like. No overthinking this, almost anything works.

2. Cut two 12-inch squares of fabric.


3.  Cut two 12-inch squares of 100% cotton batting.   
4.  Fold a square in batting side out.  Measure 2.5 inches and pin on each side along fold.


5. Sew a dart on each side.  Then fold the square in half the other way and sew two darts.
6. Repeat steps 4 and 5 on the second square.

                                                 
7.  Pin your two squares right sides together, nesting the darts.  Leave a gap of about three inches on one side to pull your fabric through.

8. Pull your right side out and iron.  Be sure to iron the opening so you can sew it closed when you do the top stitching.
                                                   

9. Sew all the way around your bowl twice about ¼ inch apart.  Easy!
Two examples of my bowls using scrap fabric.
                                   

These are fairly easy to make and I figure it's not too early to build up a stash for the holiday season.  I am actually using mine for warming up bowls of soup in the microwave.

Let me know if you make any and how you use them.  I would love your feedback and any ideas you may want to share.

Keep creating!